
jstree组件的使用详细教程,部分案例( PHP / fastAdmin )
jstree 组件的使用。
简介:JsTree是一个jquery的插件,它提交一个非常友好并且强大的交互性的树,并且是完全免费或开源的(MIT 许可)。Jstree技持Html 或 json格式的的数据, 或者是ajax方式的动态请求加载数据。
1、引用
我这里使用的是 php 的 fastadmin 框架 ,需要在js页面的最上方define添加 ’ jstree ',否则会无法使用jstree插件,代码如下
define(['jquery', 'bootstrap', 'backend', 'table', 'form','jstree'],
		function ($, undefined, Backend, Table, Form) {
如果没用这个框架,则需要从官网下载js包进行引用。在引用前需先引用Jquery.
<script src="jquery.min.js"></script>
<script src="dist/jstree.min.js"></script>
2、使用
首先需要在前端的html页,加入
<div id="jstree"></div>
在js页面中首先添加 ready ()函数,之后的jstree代码我都会写在这里面。
 $(document).ready(function () {

 });
3、加载树节点
 $('#jstree').jstree({
                    'core': {},// 请求后端数据接口
                    'plugins': [],  // 启用右键菜单和拖拽/放置功能
                    'check_callback': function () { },
                    'contextmenu': { },//定义右键菜单
                    'themes': {
                        'icons': false  // 关闭jstree默认图标
                    },
                    'types': {} //图标类型
                });
core
core 是用来请求后端接口,加载树节点用
'core': {
       'data': {
        'url': 'machine/state_list/ajax_get',
        'data': function (node) {
        return {
        		'id': node.id ,//传递给后端的节点ID
                'capacity_id': $("#c-capa_id").val() //后端需要接收的数据
                //如果还有别的要传递后端可在这继续添加
              };
           }
       },
       'check_callback' : true, // 允许对节点进行动态操作
},
plugins
这个是树节点的功能 、形态、右键菜单等,
checkbox:多选框,每个节点前都会有一个多选
dnd :拖拽功能,可拖拽节点到别的节点上
contextmenu:右键菜单功能
html_data:节点样式、icon等都需要添加这个
当然还有别的 ,需去官网进行查阅
 // 'plugins': ['contextmenu', 'dnd','html_data','themes', 'types',"checkbox","contextmenu"],  // 启用右键菜单和拖拽/放置功能
//dnd 可拖拽
'plugins': ['contextmenu', 'html_data','themes', 'types',"contextmenu"],  // 启用右键菜单和拖拽/放置功能
contextmenu
右键菜单栏,我这里仅展示 添加修改和编辑的,如有别的需求可自行添加。
添加
add 原理,添加一个节点的同时,给他选择进行编辑节点。
添加和编辑的 回调函数需要用rename_node.jstree 进行监听。所以没在这里。
 'contextmenu': {  // 定义右键菜单
			'items': function( node ) {
					var items = {
                                "add":{
                                    "label":"添加",
                                    "icon" : "glyphicon glyphicon-plus",
                                    "action":function(data){
                                        var inst = $.jstree.reference(data.reference),
                                        obj = inst.get_node(data.reference);
                                        inst.create_node(obj, {}, "last", function (new_node) {
                                            try {
                                                new_node.text="输入名称";
                                                //回调函数在下方的 'rename_node.jstree' 监听编辑完时候触发实现。
                                                inst.edit(obj);
                                            } catch (ex) {
                                                setTimeout(function () { inst.edit(new_node); },0);
                                            }
                                        });
                                    }
                                },
                                "update":{
                                //代码在下面展示
                                }
		}

},
修改
update
"update":{
          "label":"修改",
          "icon":"glyphicon glyphicon-leaf",
          "action":function (data){
          		//根据自己的判断条件判断是否允许修改,没有可以吧判断去掉。
               if(node.id=="t_1"){
                   layer.msg(node.text+"不能修改",{time:'1000'});
               }else{
                 var inst = $.jstree.reference(data.reference),
                 obj = inst.get_node(data.reference);
                 inst.edit(obj);
               }
         }
},
删除
del
删除的回调函数在这里进行调用后端接口。当后端删除成功,返回时才能删除节点,否则不给予删除。
id:node.id 表示传入当前节点的ID。
注:response.success 中的 success 是后端传回来的字段。我这里返回是true或者false。
"del":{
     "separator_before": false,
     "icon": false,
     "separator_after": false,
     "_disabled": false, //(this.check("delete_node", data.reference, this.get_parent(data.reference), "")),
     "label": "删除",
     "icon":"glyphicon glyphicon-remove",
     "action": function (data) {
			$.get("machine/state_list/ajax_del",{id:node.id},function (response){
            // console.log(response.msg);
            //删除成功才进行删除节点
            if(response.success){
            	layer.msg(response.msg,{time:'1000'});
            	//删除节点
            	var inst = $.jstree.reference(data.reference),
            		obj = inst.get_node(data.reference);
            	if(inst.is_selected(obj)) {
               	 	inst.delete_node(inst.get_selected());
            	}else {
                	inst.delete_node(obj);
            	}
            }else{
               layer.msg(response.msg,{time:'1000'});
                // console.log('删除失败');
             }
            })

    }
}
types
这个是节点图标的类型。
其中的parent 、 child、grandchild 需要在后端传回的数据中进行定义。
'types': {
           'default': {
                  		    'icon': 'glyphicon glyphicon-star'  // 设置默认节点图标(这里使用了Bootstrap的glyphicon图标)
                       },
           'parent' : {
                            'icon' : 'fa fa-folder-open'  // 父节点图标
                        },
             'child' : {
                            'icon' : 'glyphicon glyphicon-file'  // 子节点图标
                        },
        'grandchild' : {
                            'icon' : 'glyphicon glyphicon-leaf'  // 第三级节点图标
                        }
                        //如还有节点可继续添加
 }
节点加载的就到这。
4、监听,节点编辑完成时触发
这里补充 右键菜单 的添加和编辑功能。
//监听,节点编辑完成时候触发
$('#jstree').on('rename_node.jstree', function (e, data) {
	console.log('节点ID:',data.node.id);
	console.log('节点名称:', data.node.text);
	var capaid=$("#c-capa_id").val();//需要传递后端的数据
	if(data.node.text!="输入名称"&&data.node.text!=""){
		$.get("machine/state_list/ajax_addChildNode",{nodeId:data.node.id,Text:data.node.text,capacityid:capacityid},function (response){
			if(response.success){
				//执行成功后处理逻辑
			}else{
			}
		}
	}else{
		layer.msg("请输入有效名称!",{time:'1000'});
		// 删除节点
        $('#jstree').jstree().delete_node(data.node.id);
	}
});
5、加载完树节点后的回调函数
//监听 加载完树节点后的回调函数
$('#jstree').on('ready.jstree', function (e, data){
     $("#toggleButton").css('display','block');
});
6、选择节点时,更新下拉框的值
选择一个节点时触发
$('#jstree').on("select_node.jstree", function (e, data){
	 var node = data.node;
	 alert(node.text+' '+node.id);
	 //处理函数,也可以请求后端接口。
	 $.ajax({
		 method: 'post',
		 url: '',
	 	 data: { id: node.id },
		 success: function (response) {
		 },
		 error: function (error) {
	 	}
	 })
}
7、全选和展开
需要在HTML 中添加两个多选框 。
//全选
$(document).on("click", "#checkall", function () {
       $("#jstree").jstree($(this).prop("checked") ? "check_all" : "uncheck_all");
});
//展开
$(document).on("click", "#expandall", function () {
       $("#jstree").jstree($(this).prop("checked") ? "open_all" : "close_all");
});
8、加载完成后回调函数
//监听加载完成后的回调函数
$('#jstree').on('loaded.jstree',function (){
 		var node = data.node;
     //选中节点
     $('#jstree').jstree('select_node',node.id);
     //其他处理
     //......
})
9、加载树的后端代码。
思来想去,还是贴一点后端代码吧。我这里用的是php。
$id, $capacity_id 是用来接收前端传过来的参数。
其中 dren 是别的函数,主要加载子节点的逻辑。
‘children’ => $ch1 表示加载子节点。
‘children’ => false 表示该节点下面不存在子节点
‘type’=>‘parent’ 这里代表的是前面提到的 icon,节点图标。他的名称就是在这里设置的。
‘state’ => [ ‘opened’ => true ] 为true表示加载完成是处于展开状态。
public function ajax_get($id, $capacity_id)
{
//查找子节点
$ch1=$this->dren($capacity_id,1);
$ch2=$this->dren($capacity_id,2);
$data = [
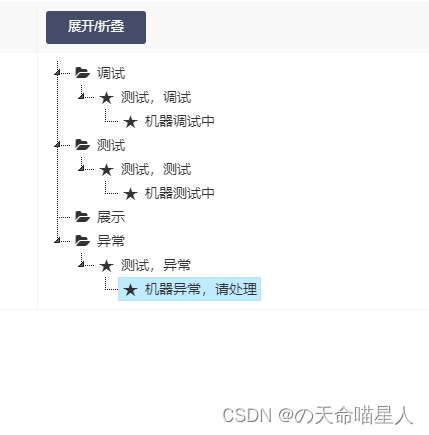
['id' => 't_1','text' => '调试','state' => [ 'opened' => true ],'type'=>'parent','children' => $ch1],
['id' => 't_2','text' => '测试','state' => [ 'opened' => true ],'type'=>'parent','children' => $ch2],
['id' => 't_3','text' => '展示','state' => [ 'opened' => true ],'type'=>'parent','children' => false],
['id' => 't_4','text' => '异常','state' => [ 'opened' => true ],'type'=>'parent','children' => true]
];
return json($data);
}
别的接口的 返回参数
例如:删除的
public function ajax_del($id){
	$success=[];
	//.....删除的逻辑代码
	$success=['msg'=>'删除成功',"success"=>true];
	//.....别的删除逻辑代码

	return $success;
}
jstree 教程到此结束,对你有帮助的希望点个赞。